

21 Summer Beach Nails 2026: Cute Coastal Designs, Bright Colors & Inspo Ideas
There’s something about beach nails season that makes everyone reach for ocean inspired nail art, and 2026 is delivering some of the most creative coastal designs yet. This collection pulls together everything from shimmering mermaid scales to soft seashell details, giving you plenty of options whether your idea of summer means a quiet shoreline walk or a loud, colorful beach party. Some designs lean into deep, moody ocean tones, while others stay light and pastel, so the overall mood shifts quite a bit depending on which idea catches your eye. What ties everything together is that unmistakable connection to water, whether through color, texture, or small hand painted sea creatures scattered across the nail.
Beach nail art has a way of feeling both nostalgic and completely fresh at the same time, which probably explains why this category keeps growing on Pinterest every year. A handful of these designs are quick, simple color choices, while others involve more detailed handwork like painted starfish or layered mermaid scales. Either way, none of them require a professional level of skill to attempt, even if a few take a bit more patience than others. As you work through this list, pay attention to which color palettes and textures speak to you most, since coastal nail art really does come in dramatically different moods. By the end, you should have a solid shortlist of designs worth bringing to your next appointment or trying yourself at home.
Seafoam Chrome Ombre Nails with Ocean Mist Glow
This design takes the familiar seafoam color and gives it a reflective, almost misty quality by layering chrome powder over a soft green to white gradient. The base itself fades gently from a pale seafoam near the cuticle into a nearly white tip, and once that gradient is set, a light dusting of chrome powder is buffed over the whole nail to add a hazy, luminous shine. Rather than the sharp, mirror like finish typical of most chrome designs, this version stays softer and more diffused, which is where the “ocean mist” quality really comes through. It works nicely on nails of almost any length, though a slightly longer nail does give the chrome finish more room to catch light as your hand moves.
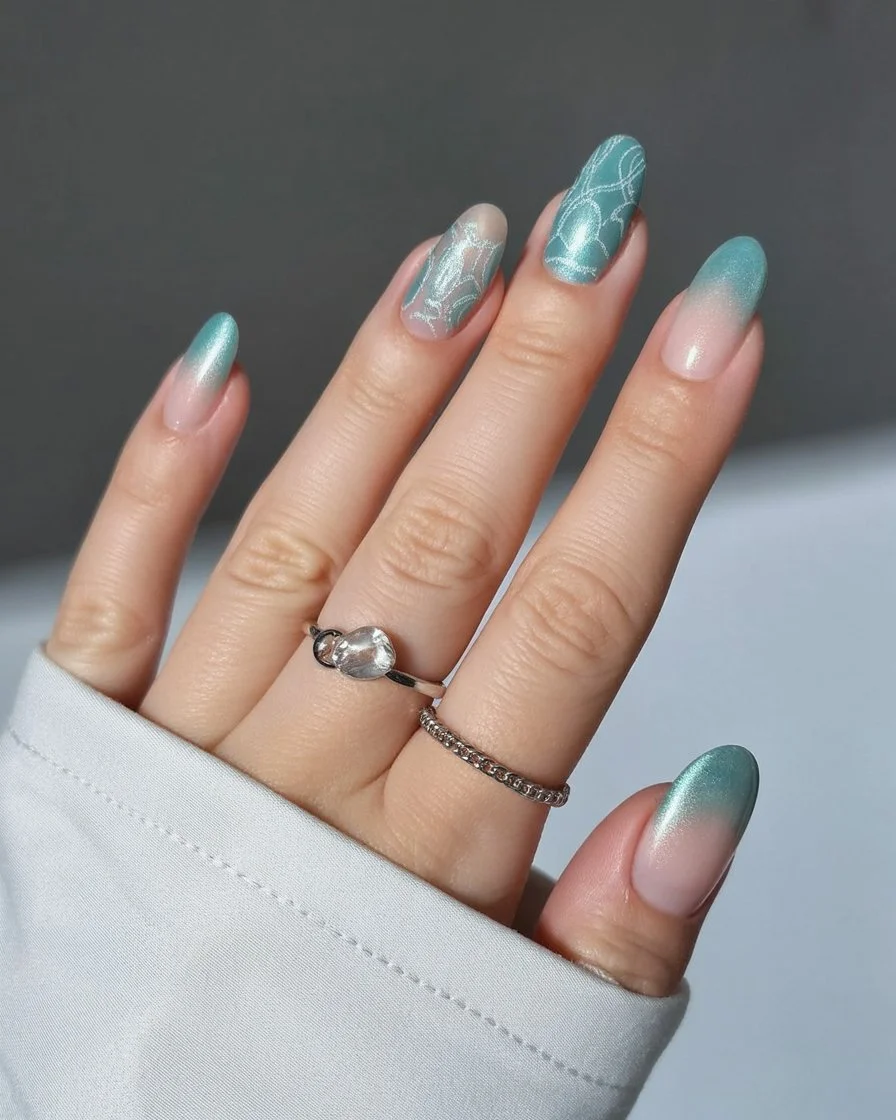
Building this design starts with a sheer white base, left to dry fully before any color goes on. A soft seafoam green is applied near the cuticle, then blended upward into the white using a sponge, working in small dabbing motions until the transition looks smooth rather than blocky. Once that gradient has cured, chrome powder gets buffed on using a soft applicator, moving in gentle circles rather than pressing hard, since too much pressure can disturb the color underneath. Because the chrome sits directly on top of a light gradient rather than a solid color, the shine ends up looking softer and more atmospheric than a typical chrome manicure. Skipping a heavy top coat here usually preserves more of that misty effect, though a very thin one can still be added for durability.
Outfit wise, this pairs naturally with flowing summer dresses or simple linen separates, since the nails already carry plenty of visual interest on their own. It’s a strong choice for beach vacations specifically, since the color story mirrors actual ocean water almost exactly. Quite a few people choose this design for destination trips, wanting their nails to match the environment they’re heading into. On Pinterest, searches for chrome finishes paired with soft gradients have been climbing steadily this year. It’s become one of the more requested coastal looks precisely because it doesn’t rely on any single sharp color, just a shifting, glowing quality that feels genuinely oceanic.
Emerald Starfish French Nails with Tropical Coast Energy
Rather than sticking with the usual pastel palette so common in beach nail art, this design swaps in a rich emerald green for the tip color, giving the classic French manicure a bolder, more tropical feel. A tiny starfish, painted in a lighter cream or gold tone, sits near the base of one or two nails, adding a hand painted detail without overwhelming the deeper green tip. The contrast between the sheer, natural base and that saturated emerald edge is what makes this design stand out from lighter coastal looks, giving it a more sophisticated, jewel toned quality. This style tends to suit medium length nails best, since the tip needs enough surface area to really show off the color depth.
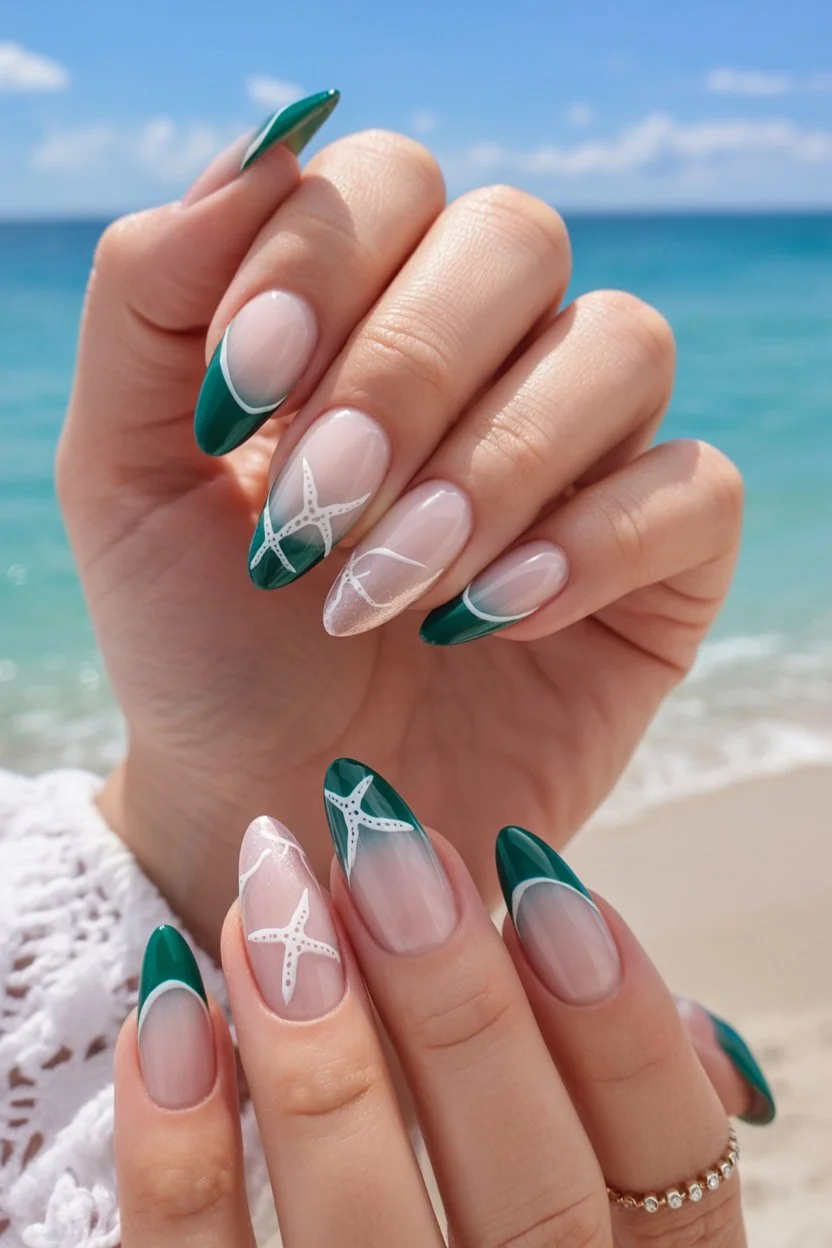
To achieve the look, start with a sheer, natural pink or nude base painted across the entire nail and allowed to dry completely. The emerald green then gets applied along the tip using a steady, controlled stroke, ideally in two thin coats rather than one thick one, since green pigments can sometimes go on unevenly if rushed. Once that tip has fully set, a small detail brush comes in for the starfish, built from five slightly uneven points radiating out from a central body, kept intentionally imperfect so it reads as hand drawn rather than stamped. A few tiny texture dots across the starfish surface help it look more dimensional. Sealing everything under a glossy top coat brings out the richness of the emerald and gives the whole design a polished, cohesive finish.
This design works particularly well with warm toned outfits, especially anything in cream, gold, or rust that complements the emerald without competing against it. It’s a favorite for tropical destination trips, where the deeper green feels more connected to lush island scenery than a typical beach blue would. People often choose this over lighter coastal designs when they want something that photographs well against greenery and warm sand tones together. On Pinterest, jewel toned French variations have been picking up steam as an alternative to the softer, more common pastel versions. It stands out as one of the richer, more distinctive options in this entire roundup.
Powder Blue Glitter Nails with Sea Breeze Elegance
This design keeps things fairly simple on the surface, a soft powder blue base finished with fine glitter, but the overall effect ends up feeling considerably more elegant than the ingredient list suggests. The blue itself sits on the muted, dustier end of the spectrum rather than anything bright or saturated, which gives the whole look a calm, breezy quality before the glitter even comes into play. Instead of chunky, obvious sparkle, this version relies on very fine glitter, almost more of a shimmer than traditional glitter, scattered lightly across the nail rather than packed in heavily. It suits basically any nail shape or length without much adjustment needed. The appeal here is really about restraint, proving that a coastal manicure doesn’t need bold color or intricate detail to feel intentional and polished.
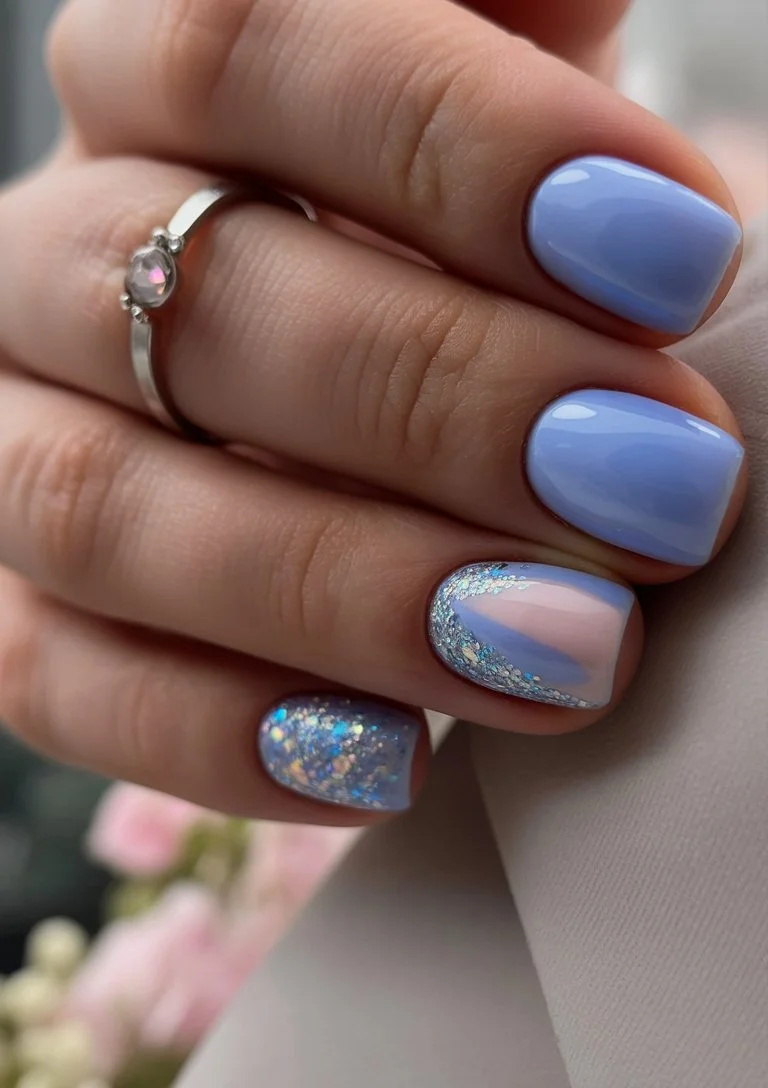
Getting this finish right starts with two even coats of the powder blue polish itself, allowing full drying time between layers so the color builds smoothly rather than looking patchy. Once that base has set completely, a fine glitter polish gets applied in a single thin layer, ideally wiping most of the product off the brush first so what transfers to the nail stays delicate rather than heavy. Some people prefer concentrating the glitter more toward the tip, letting it fade out as it moves toward the cuticle, while others spread it evenly across the whole nail for a more uniform shimmer. A thick, high quality top coat matters quite a bit here, since it smooths over any texture the glitter creates and keeps the surface from feeling gritty. Letting that top coat cure fully before touching anything helps preserve the smooth finish this look depends on.
Because the color stays so understated, this design pairs easily with almost any summer wardrobe, from linen to swimwear to more polished daytime outfits. It works particularly well for beach weddings or upscale coastal events, where a subtle sparkle feels more appropriate than anything louder. People often choose this over bolder glitter designs specifically because it reads as refined rather than flashy. On Pinterest, muted blue tones paired with fine shimmer continue to perform well among those searching for elegant, understated beach inspired nails. It remains one of the more versatile, easy to wear choices in this collection, fitting into nearly any coastal occasion without feeling out of place.
Blue Floral Sunset Nails with Soft Coastal Romance
Blue floral sunset nails bring together two elements that don’t usually appear side by side, delicate hand painted flowers and a warm, glowing sunset gradient, layering them so the florals sit gently on top of a soft peach to blue fade. The gradient itself moves from a warm peachy tone near the cuticle into a cooler powder blue near the tip, capturing that transitional light you see right as day turns to evening near the water. Small blue flowers are then painted over portions of the gradient, usually clustered on one or two accent nails rather than spread across the entire set. This combination of warm and cool tones, softened further by the floral detail, gives the design a romantic, almost painterly quality that feels distinct from more straightforward beach looks.
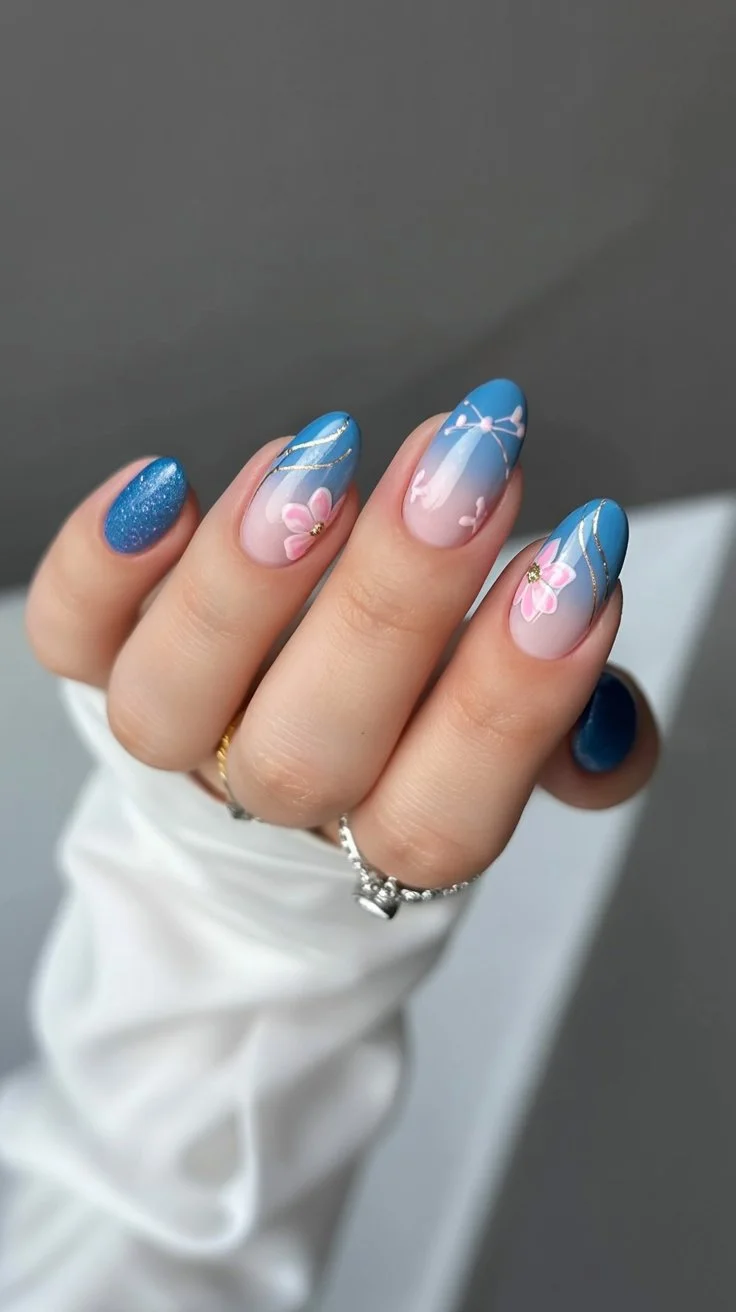
To create this look, begin with a sheer nude base and let it dry fully before starting the gradient work. Apply a soft peach near the cuticle and a powder blue near the tip, blending the two together with a makeup sponge in gentle, overlapping dabs until the transition feels smooth rather than abrupt. Once that gradient has cured completely, switch to a fine detail brush and paint small five petal flowers in a slightly deeper blue, scattering them loosely across one or two nails rather than arranging them too symmetrically. A tiny white or cream dot at the center of each flower adds just enough definition to make the shape read clearly. Finishing with a glossy top coat ties the warm and cool tones together and gives the floral detail a soft, cohesive shine.
This design pairs beautifully with flowing summer dresses in warm or dusty tones, since the gradient itself already spans both color families. It suits evening beach walks, sunset dinners, or any coastal occasion where a bit of romance feels fitting alongside the ocean theme. Many people are drawn to this look because it doesn’t commit fully to either warm or cool tones, instead capturing that in between moment most sunset designs skip past. On Pinterest, this kind of layered floral gradient continues to gain traction among those wanting something a bit more painterly than a standard color fade. It remains one of the more emotionally evocative choices in this roundup, built around mood as much as color.
Pastel Mermaid Scale Nails with Dreamy Ocean Colors
Pastel mermaid scale nails take the popular scale texture technique and soften it considerably, using pale lavender, mint, and blush pink instead of the bolder jewel tones usually associated with mermaid inspired designs. The scale pattern itself is created using small overlapping semicircles, layered row by row up the nail, but here each scale gets filled with a slightly different pastel shade rather than one uniform color. The result feels dreamier and lighter than typical mermaid nails, closer to cotton candy than deep sea, while still keeping that same distinctive scale texture people recognize instantly. This design tends to look best on longer nails, since the scale pattern needs enough vertical space to build up several rows without feeling cramped. It’s a design that rewards patience, since the layered technique does take longer than most others on this list.
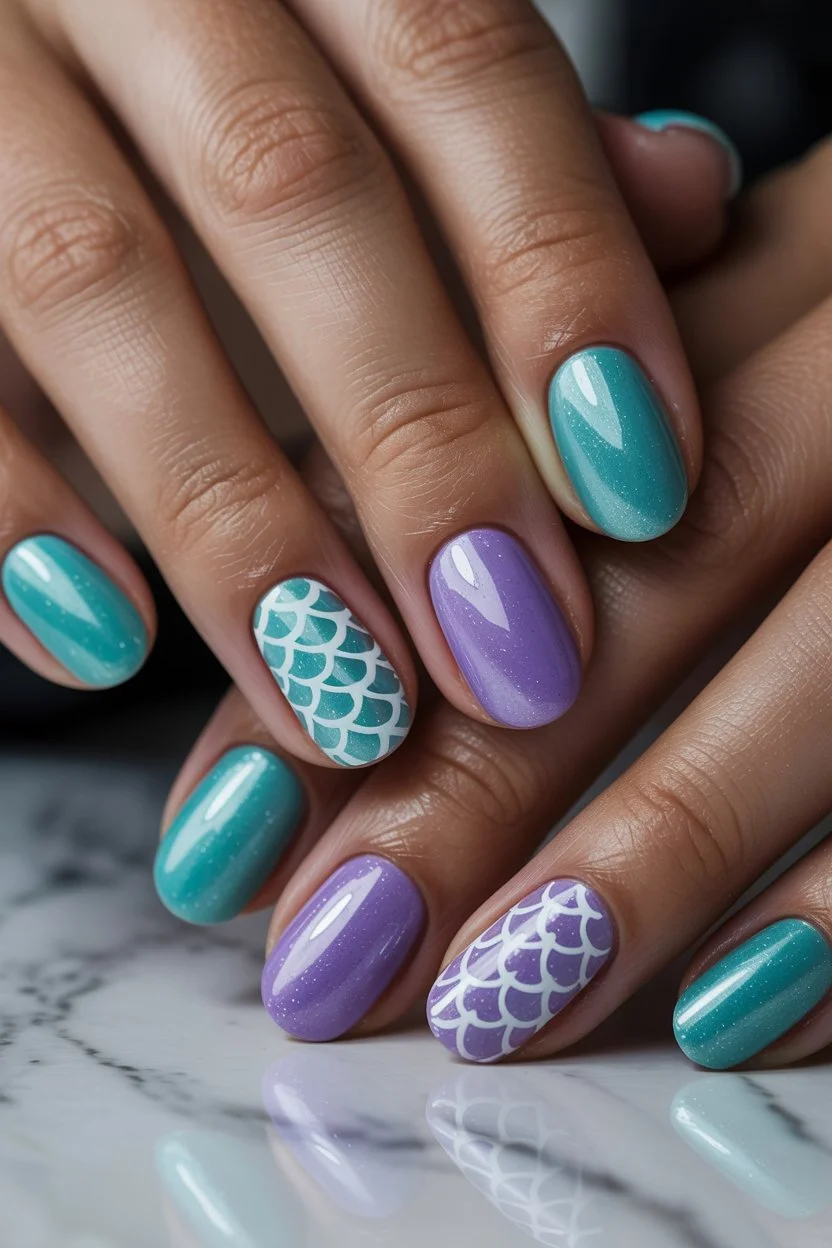
Building this look starts with a white or very pale base coat, giving the pastel scales a clean, bright surface to sit against. Using a small round brush or a dotting tool, paint a row of small semicircles along the bottom edge of the nail, alternating between your chosen pastel shades as you move across. Once that first row is dry, a second row gets painted just above it, positioned so each new scale overlaps slightly into the gap between the two scales below, continuing this pattern until the whole nail is covered. Working in thin layers and letting each row dry before starting the next helps prevent the colors from smearing into each other. A glossy top coat at the end really matters here, since it’s what gives the finished scales that glassy, iridescent quality mermaid designs are known for.
This design suits playful, feminine summer outfits, particularly anything already leaning pastel or whimsical in its own right. It’s a popular choice for beach themed parties, mermaid birthday celebrations, or simply for anyone wanting their nails to feel a bit more fantastical than usual. People often choose the pastel version specifically because it feels wearable in everyday settings, unlike bolder mermaid designs that can feel more costume like. On Pinterest, softer takes on mermaid scale texture have been steadily gaining ground over the more saturated originals. It stands out as one of the more technically involved but visually rewarding designs in this entire collection.
Sea Glass Glitter Nails with Coastal Treasure Vibes
Sea glass glitter nails draw inspiration from the smooth, frosted pieces of glass that wash up along certain coastlines, aiming to recreate that slightly cloudy, worn in texture through a mix of muted color and scattered glitter. Unlike a typical glossy glitter manicure, this design leans into a softer, more matte looking finish, using pale green, blue, and occasional lavender tones layered with fine glitter to mimic the way real sea glass catches light unevenly. Rather than one solid color, several muted shades are often used across different nails, similar to how a handful of collected sea glass pieces would never all match exactly. This variation between nails is actually part of the appeal, giving the whole set a collected, treasure like quality rather than a uniform manicure.
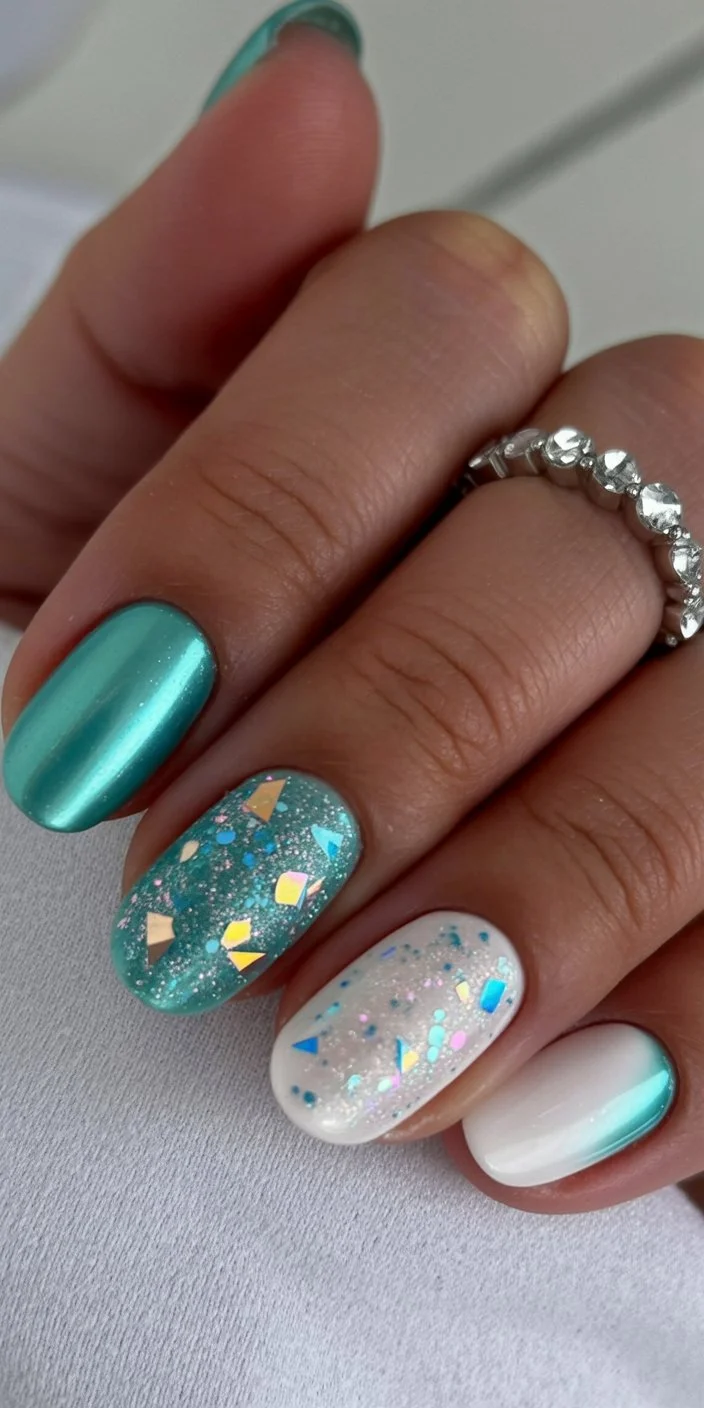
To recreate this effect, start with a sheer white base on each nail, then apply your chosen muted color, whether that’s soft seafoam, dusty blue, or pale lavender, keeping each nail slightly different from its neighbors. Once the base color has dried, a fine glitter polish gets applied in a thin, even layer, focusing on subtlety rather than heavy sparkle so the glitter reads as texture rather than shine. A frosted or satin top coat, rather than a high gloss one, helps recreate that slightly cloudy, worn quality real sea glass has, muting the shine just enough to feel authentic. Some people like adding a very light buff to the final finish for an even more matte, weathered look. Taking time to vary the color slightly from nail to nail makes a noticeable difference in how convincing the sea glass effect ultimately looks.
This design pairs naturally with relaxed, textured summer fabrics like linen or woven materials that share a similar organic, collected quality. It’s especially popular for beach vacations or coastal getaways, where the muted, varied palette feels genuinely connected to the shoreline rather than just loosely beach themed. People are often drawn to this look because it offers color and texture without leaning into anything too bright or attention seeking. On Pinterest, sea glass inspired nail art continues to be saved by those wanting something with a bit more nuance than a standard solid color or gradient. It remains one of the more understated, texture focused choices in this collection, built around subtlety rather than bold statement making.
Deep Ocean Starfish Nails with Underwater Escape Energy
Deep ocean starfish nails move away from the lighter, pastel coastal designs and instead lean into a rich, saturated navy base meant to evoke the deeper, more mysterious parts of the sea rather than shallow shoreline water. A single starfish, painted in a contrasting warm coral or gold tone, sits on one or two accent nails, standing out dramatically against the dark navy backdrop. This high contrast approach gives the design a bolder, more dramatic presence compared to lighter beach nails, closer to an underwater photograph than a sunny afternoon at the shore. The deep navy also tends to photograph beautifully against tanned skin, which is part of why this particular color combination keeps showing up in summer nail roundups.
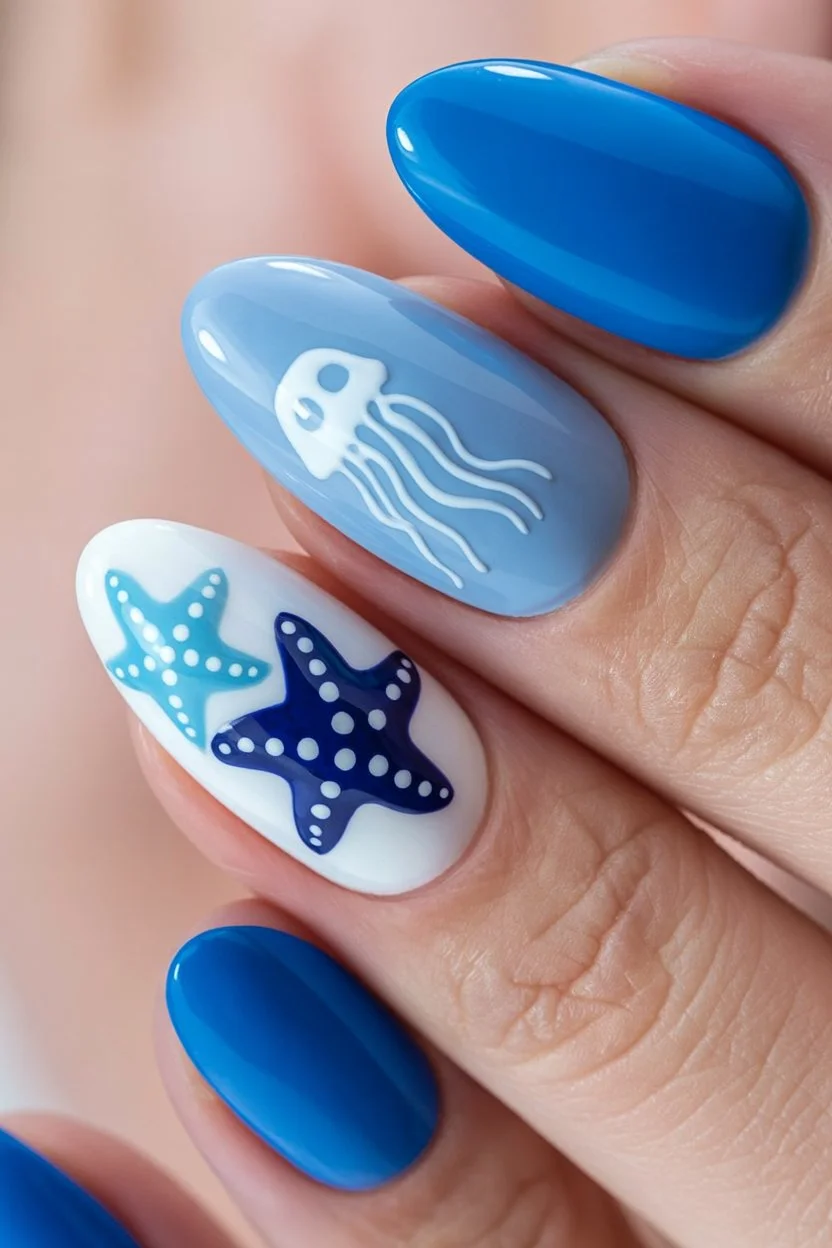
Creating this look starts with two full coats of a deep navy polish, allowing plenty of drying time between layers since darker shades can sometimes stay tacky longer than lighter colors. Once the navy base has completely set, a fine detail brush comes in for the starfish, built using five slightly irregular points radiating from a small central body, painted in a warm coral or metallic gold for maximum contrast against the dark background. Small texture dots added across the starfish surface afterward help give it a bit more dimension and realism. Because the color contrast here is so strong, keeping the starfish shape clean and confident matters more than it would against a lighter, more forgiving base. A glossy top coat finishes the design, deepening the navy and making the accent color practically glow against it.
This design pairs beautifully with warm, sun kissed outfits in coral, gold, or cream, colors that echo the starfish detail while contrasting nicely against the deep navy nails themselves. It works particularly well for evening beach events, where the darker base feels more fitting than a lighter daytime shade would. Many people gravitate toward this look specifically because it offers something moodier and more dramatic within the broader beach nail category, most of which leans considerably lighter. On Pinterest, darker ocean inspired designs like this one continue to attract those wanting a coastal theme without an entirely pastel palette. It remains one of the more striking, high contrast choices in this collection.
Silver Wave Nails with Minimal Coastal Chic
Silver wave nails strip the ocean theme down to its simplest visual element, a single curved line meant to suggest movement, rendered in a cool metallic silver against a clean, neutral base. Rather than layering multiple colors or textures, this design relies entirely on the shape of the wave itself and the shine of the metallic polish to carry the whole look. The wave typically curves gently from one side of the nail to the other, sometimes with a small secondary curve beneath it to suggest a bit more motion without adding any actual color variation. This restraint is exactly what gives the design its minimal, modern feeling, distinguishing it from busier, more detail heavy coastal nails. It works well on almost any nail shape, since the single wave line adapts easily to different lengths and widths.
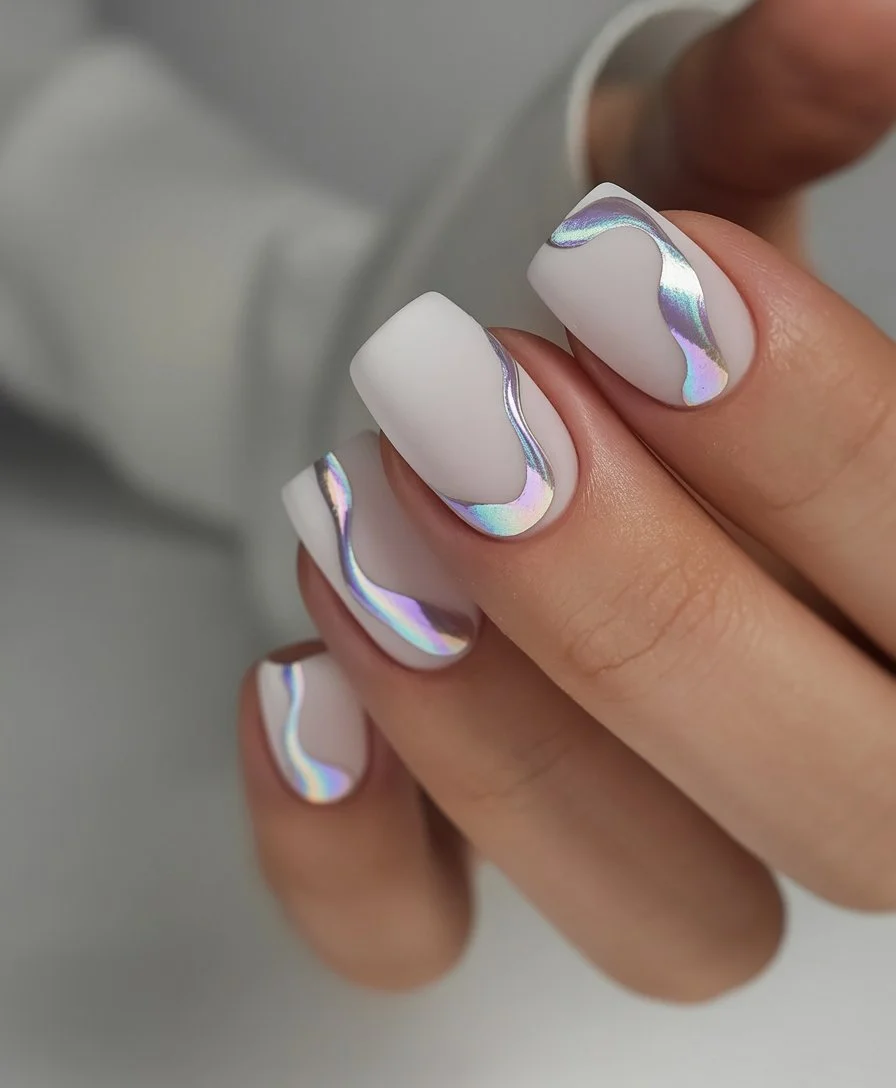
To recreate this design, start with a sheer white or very pale nude base, letting it dry completely before adding any wave detail. Using a thin nail art brush or striping polish, paint a single curved silver line across the nail, working slowly to keep the stroke smooth rather than shaky or uneven. If adding a second, smaller wave beneath the first, keep it noticeably thinner so the two lines don’t compete visually for attention. Because the entire design rests on just one or two clean lines, precision matters quite a bit more here than in designs with more going on to distract from small imperfections. A glossy top coat finishes the look, giving the silver line a crisp, reflective shine that catches light nicely against the plain background.
This design pairs naturally with minimalist summer wardrobes and simple silver jewelry that echoes the metallic detail on the nails themselves. It suits everyday wear, work settings, or any occasion calling for a coastal theme that still feels understated and polished rather than overtly beachy. People often choose this look specifically because it lets them nod to the ocean theme without committing to bright color or elaborate detail. On Pinterest, minimalist wave designs like this continue to be saved by those preferring subtle, line based nail art over anything more maximalist. It stays one of the more versatile, low key choices in this entire roundup.
Hot Pink Ombre Nails with Beach Sunset Glow
Hot pink ombre nails skip the softer, more muted sunset palettes found elsewhere in this collection, instead going bold with a saturated hot pink that fades into a deeper magenta near the tip for something considerably more vibrant and attention grabbing. Rather than blending toward orange or peach, this version stays entirely within the pink family, relying on tonal intensity rather than a shift in hue to create depth. The result feels bright and energetic, closer to the loud, saturated colors you’d see right at the peak of a summer sunset rather than the softer, muted transitional light. This style tends to work best on medium to long nails, where the gradient has enough space to fully develop its range from lighter to darker pink.
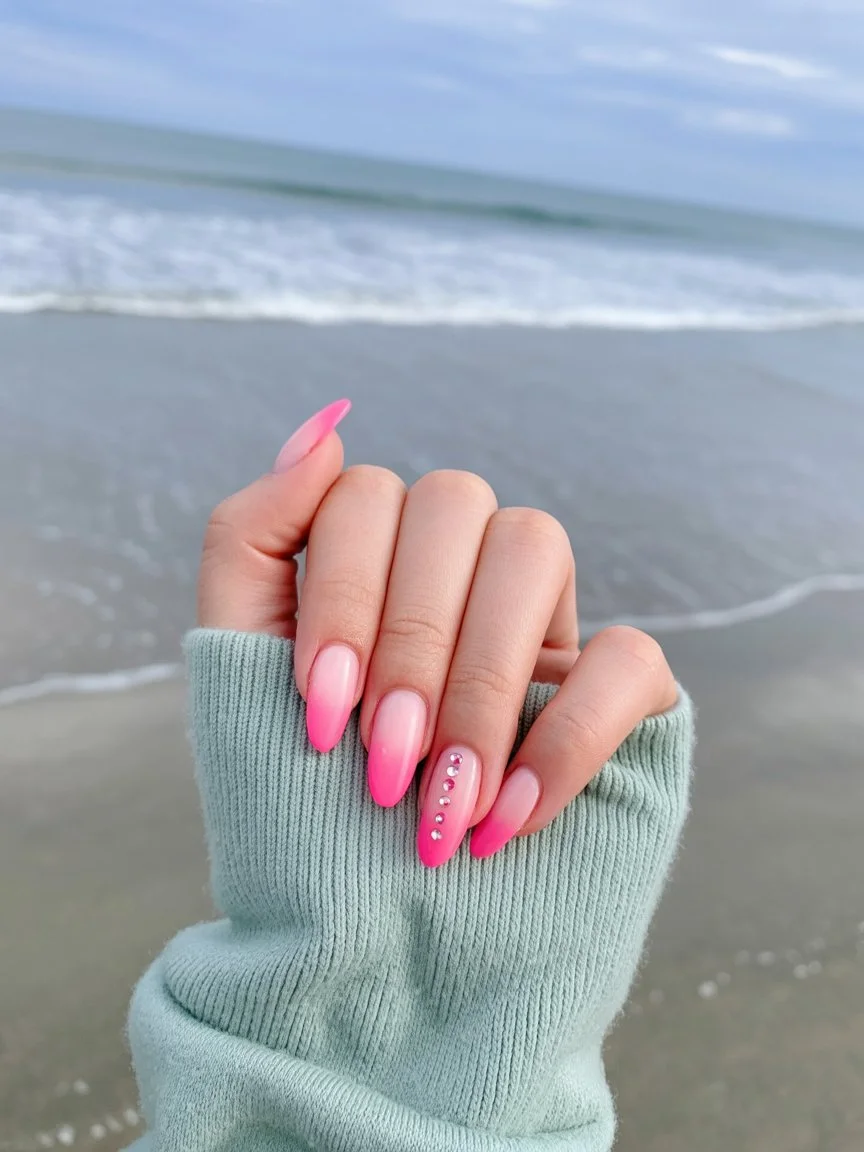
Building this gradient starts with a sheer nude base, allowed to dry completely before any pink goes on. A brighter, lighter hot pink gets applied near the cuticle, while a deeper, more saturated magenta covers the tip, and the two are blended together in the middle using a makeup sponge in overlapping dabbing motions. Because both shades here are fairly saturated, careful blending in that middle zone matters quite a bit to avoid the transition looking muddy or abrupt rather than smooth. Building each color in thin layers, rather than applying too much at once, gives more control over exactly how vibrant the final gradient ends up looking. A glossy top coat finishes the design, amplifying the saturation of both pink tones and giving the whole gradient an extra boost of shine.
This design pairs well with equally bold summer outfits, or works nicely as a standout accessory against something simpler and more neutral. It suits beach parties, festivals, or any occasion calling for a manicure with real energy and visual punch. Many people are drawn to this look because it offers all the warmth associated with sunset inspired nails while staying entirely within a single, more manageable color family. On Pinterest, bold pink gradients like this continue to perform well among those wanting maximum color impact from their beach nail choice. It remains one of the more vibrant, confident options in this entire collection.
Sea Net Accent Nails with Ocean Texture Details
Sea net accent nails introduce a woven, crisscross pattern reminiscent of fishing nets or rope, painted in fine white or cream lines over a soft blue base to add texture without relying on any additional color. The pattern itself is built from thin diagonal lines crossing over each other at regular intervals, creating small diamond shaped gaps that mimic the look of actual netting pulled taut. Rather than covering the entire nail, this design typically features the net pattern on just one or two accent nails, letting the remaining nails stay a simple solid blue for balance. This contrast between textured pattern and plain color gives the whole set visual interest without becoming overly busy or difficult to wear.
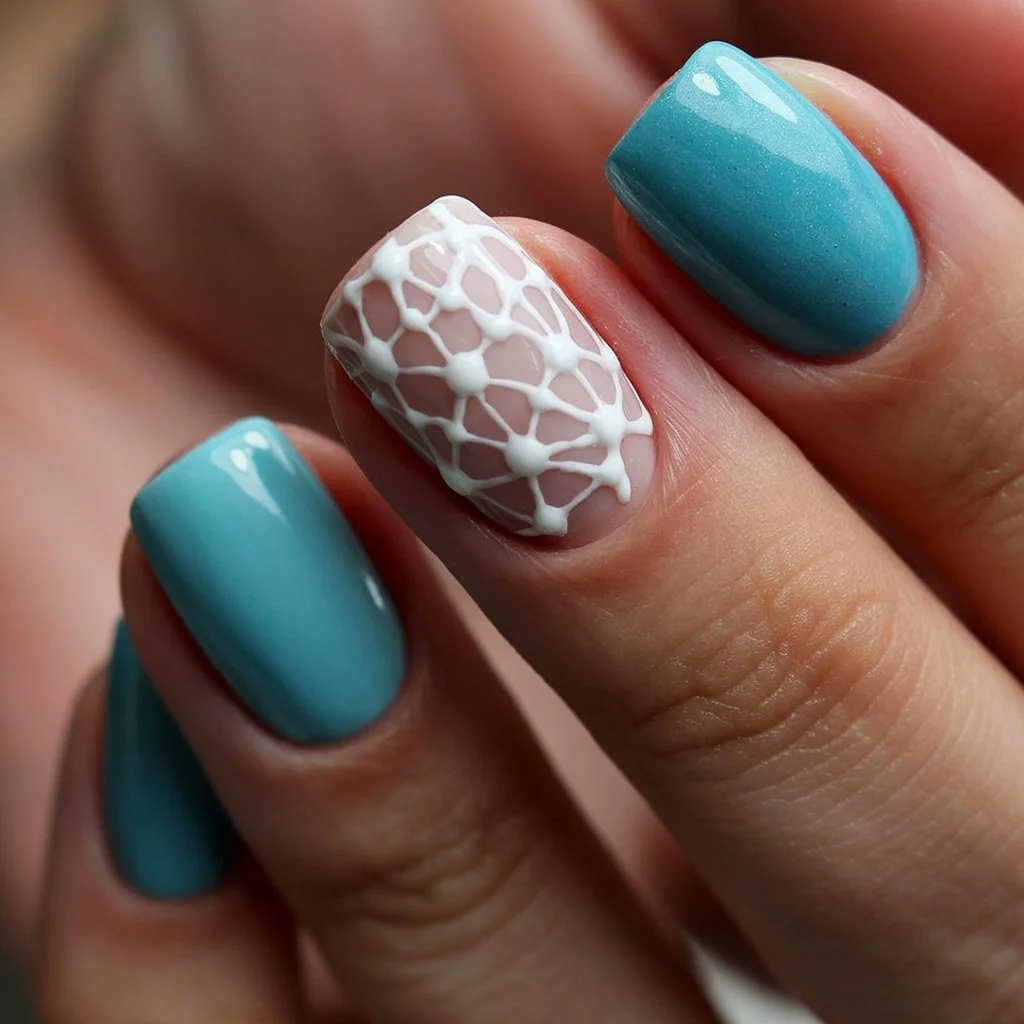
To recreate this design, apply two coats of a soft blue polish across every nail, allowing full drying time before beginning any pattern work on the chosen accent nails. Using a thin nail art brush, paint a series of parallel diagonal lines running in one direction across the nail, spacing them evenly, then repeat with a second set of parallel lines running the opposite direction to create the crossed netting effect. Keeping the spacing between lines consistent matters quite a bit here, since uneven gaps tend to disrupt the woven illusion the pattern relies on. Working slowly and steadying your hand against the table or a flat surface can help keep the lines straighter, especially since this pattern shows imperfections more obviously than looser, more abstract designs. A glossy top coat finishes the look, sealing in the netting pattern and giving the whole design a smooth, cohesive shine.
This design pairs naturally with casual, textured summer fabrics like woven straw accessories or linen, echoing the same handmade, tactile quality found in the nail art itself. It suits beach outings, boat trips, or any coastal occasion calling for a manicure with a bit of unexpected texture. Many people are drawn to this look because it offers something different from typical smooth, solid coastal designs, adding tactile interest through pattern rather than color. On Pinterest, textured designs like this continue to gain attention among those wanting more visual complexity without necessarily reaching for bold color. It remains one of the more unique, texture driven choices in this entire roundup.
Blue and Lime Fade Nails with Tropical Wave Vibes
Blue and lime fade nails combine two colors rarely paired together, a cool ocean blue and a bright, energetic lime green, blending them into one gradient that captures both water and tropical foliage in a single design. The transition moves from blue near the cuticle into lime green near the tip, creating a fade that feels distinctly tropical rather than purely oceanic, closer to the view you might get standing where clear water meets dense island greenery. Because both colors are fairly vibrant on their own, the combination reads as bold and lively rather than soft or muted, setting it apart from gentler coastal gradients elsewhere in this collection. This style works particularly well on medium to long nails, giving the two contrasting colors enough room to blend smoothly rather than looking abrupt.
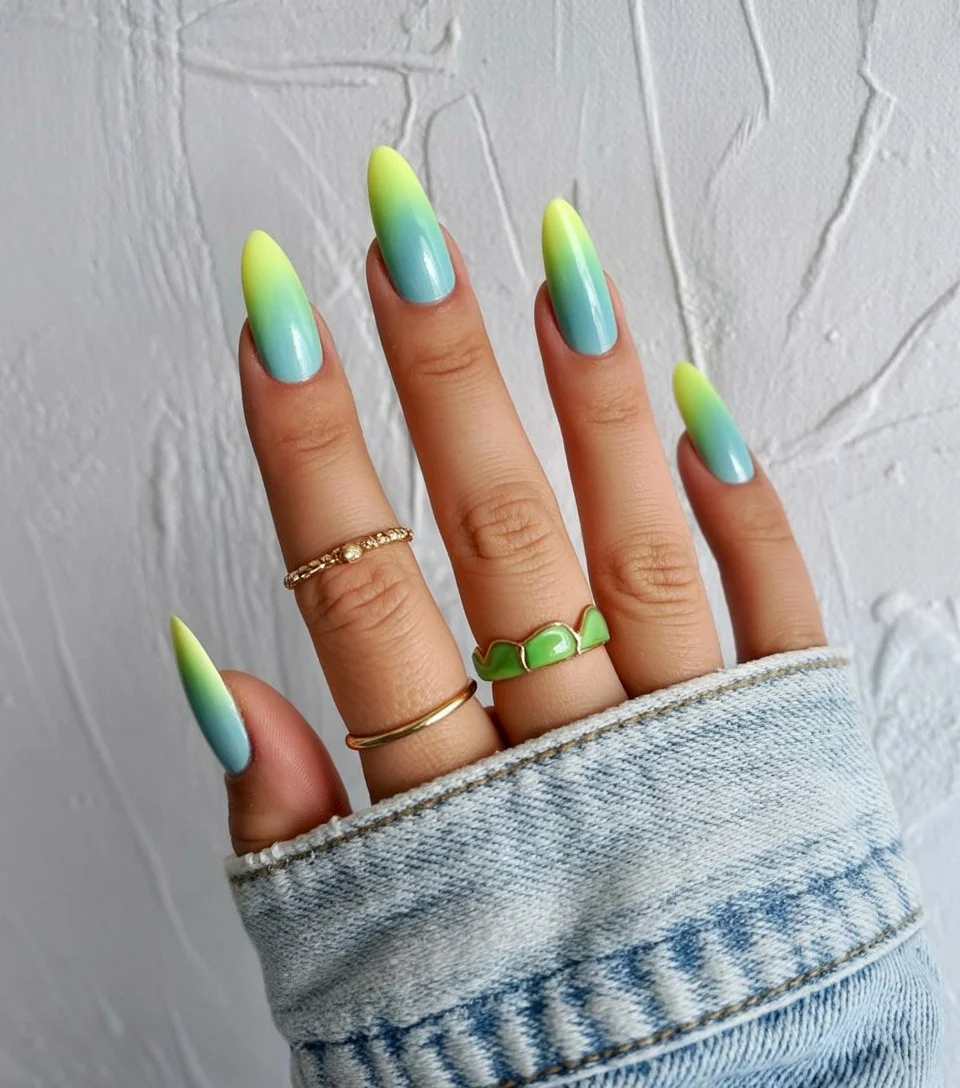
To create this gradient, start with a sheer nude base, letting it dry completely before beginning any color work. Apply a cool blue near the cuticle and a bright lime green near the tip, then blend the two together using a makeup sponge in the center section of the nail, working in overlapping dabbing motions to soften the transition between them. Because blue and green sit fairly close together on the color wheel, blending tends to go smoothly here compared to combinations involving warmer, contrasting hues, though careful attention in the middle zone still helps avoid any patchy spots. Building each color gradually in thin layers allows better control over how vibrant or subdued the final gradient looks. A glossy top coat finishes the design, enhancing both colors and giving the whole gradient a fresh, tropical shine.
This design pairs beautifully with equally vibrant tropical prints or simple solid colors that let the gradient itself take center stage. It suits island vacations, pool parties, or any occasion calling for a manicure that feels genuinely tropical rather than just generically summery. Many people are drawn to this combination because it offers something a bit unexpected compared to more common blue and pink or blue and white pairings. On Pinterest, unconventional color combinations like this one continue to attract those wanting their beach nails to stand out from more predictable coastal palettes. It stays one of the more distinctive, energetic choices in this entire collection.
Pearl Shell Nails with Seaside Luxury Energy
Pearl shell nails bring a soft, luminous quality to coastal nail art, using a pearlescent white or cream polish as the base before adding small hand painted seashell details finished with a delicate pearl like sheen. Unlike brighter, more colorful beach designs, this look stays intentionally muted and elegant, relying on subtle shimmer and fine detail rather than bold color to make its impression. The shells themselves are typically painted in soft spiral or fan shapes, kept small and understated on just one or two accent nails rather than repeated across the whole set. This restrained approach gives the design a refined, almost jewelry like quality that feels distinctly upscale compared to more casual beach nail options.
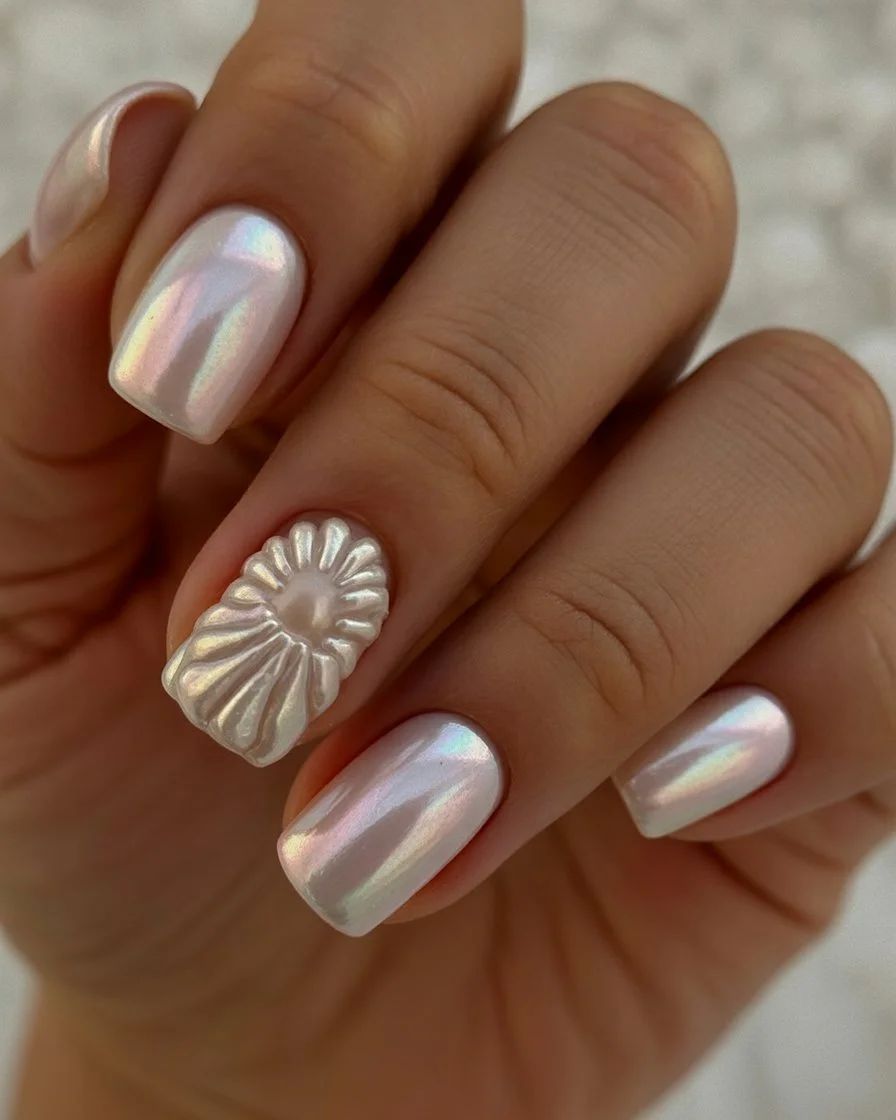
To recreate this look, begin with a pearlescent or shimmery white base coat, applying two even layers to build that soft, luminous quality this design depends on. Once the base has dried completely, use a fine detail brush to paint small shell shapes, either simple spirals or fan like forms, on one or two chosen nails, keeping the shapes small and delicate rather than large or overly detailed. Adding subtle shading in a slightly deeper cream or beige gives the shells a bit more dimension without disrupting the overall soft, elegant palette. Because the whole design relies on subtlety, working with a light hand and thin layers throughout tends to produce better results than heavier, more saturated application. A glossy top coat finishes the design, enhancing the pearlescent quality of both the base and shell detailing for a smooth, luminous shine.
This design pairs beautifully with elevated, resort style summer outfits and simple pearl or gold jewelry that complements its soft, luxurious tone. It suits beach weddings, upscale coastal events, or any occasion calling for a manicure that feels polished rather than overtly playful. Many people choose this look specifically because it offers a beach theme without leaning into anything too bright or casual, fitting more formal settings comfortably. On Pinterest, softer, more luxurious coastal designs like this one continue to gain traction among those wanting elegance alongside their ocean inspired nail art. It remains one of the more sophisticated, refined choices in this entire collection.
Pink and Blue Sunset Fade Nails with Dreamy Summer Light
Pink and blue sunset fade nails blend two cooler and warmer tones together, transitioning from a soft dusty pink into a pale sky blue for a gradient that feels closer to early morning light than a traditional fiery sunset. Rather than the typical orange to pink sunset combination, this version swaps in blue for something gentler and more unexpected, capturing that quiet, in between light you sometimes catch right as the sun starts rising or setting over water. The softness of both shades keeps the overall effect calm and dreamy rather than dramatic, distinguishing it from bolder sunset gradients found elsewhere in this list. This style suits nearly any nail shape, though longer nails give the gradient a bit more room to develop a smooth, gradual transition.
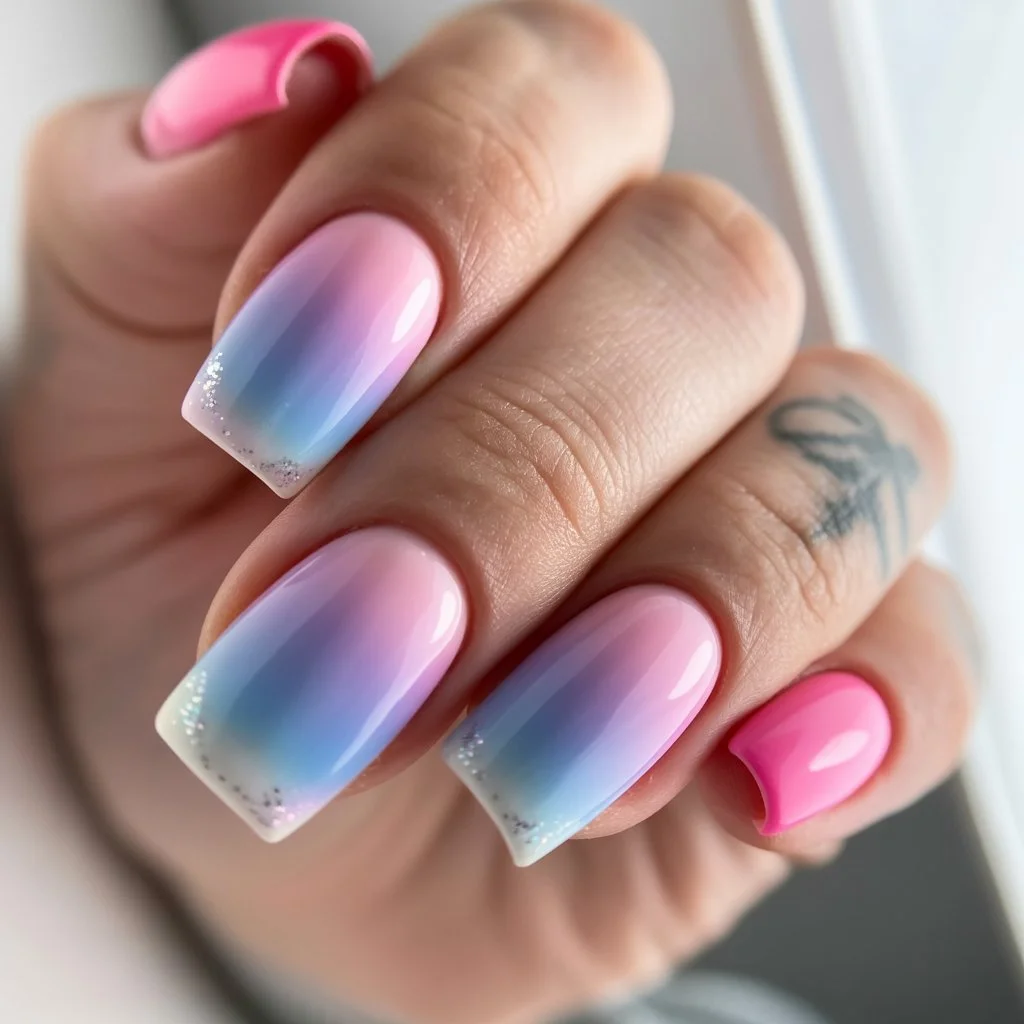
To build this gradient, start with a sheer white base coat and let it dry completely before beginning any color work. Apply a soft dusty pink near the cuticle and a pale sky blue near the tip, then blend the two together with a makeup sponge in gentle, overlapping dabs until the middle section transitions smoothly rather than looking split in half. Because both shades here are fairly light and soft, blending tends to be more forgiving than working with darker, more saturated colors, though patience still helps avoid any visible line between the two. Building each color gradually in thin layers gives more control over how balanced the final gradient looks between pink and blue. A glossy top coat finishes the design, giving the soft gradient a smooth, gentle shine that enhances its calm, dreamy quality.
This design pairs beautifully with light, airy summer outfits in either color family, since the gradient itself already bridges both palettes. It suits quiet beach mornings, sunrise photography, or any occasion calling for a manicure with a soft, contemplative mood rather than anything loud or energetic. Many people are drawn to this look because it offers something different from the more expected warm toned sunset gradients, leaning instead into a cooler, calmer version of that same concept. On Pinterest, unconventional sunset color pairings like this one continue to be saved by those wanting a fresh take on a familiar gradient style. It remains one of the more understated, atmospheric choices in this entire collection.
Pink Starfish Nails with Tropical Vacation Mood
Pink starfish nails take the familiar starfish motif and set it against a warm, tropical pink base rather than the more common blue or white backgrounds, giving the design a sunnier, more vacation ready feel overall. The starfish itself is usually painted in white or a soft cream, providing gentle contrast against the pink without pulling focus away from the warm base color entirely. This particular pairing leans into a more playful, lighthearted mood compared to the cooler, more serene ocean designs found elsewhere in this collection, feeling closer to a beach bag or sun hat than deep water. This style works nicely on almond or coffin shaped nails, where the elongated surface gives the starfish detail enough room to look clean and well defined.
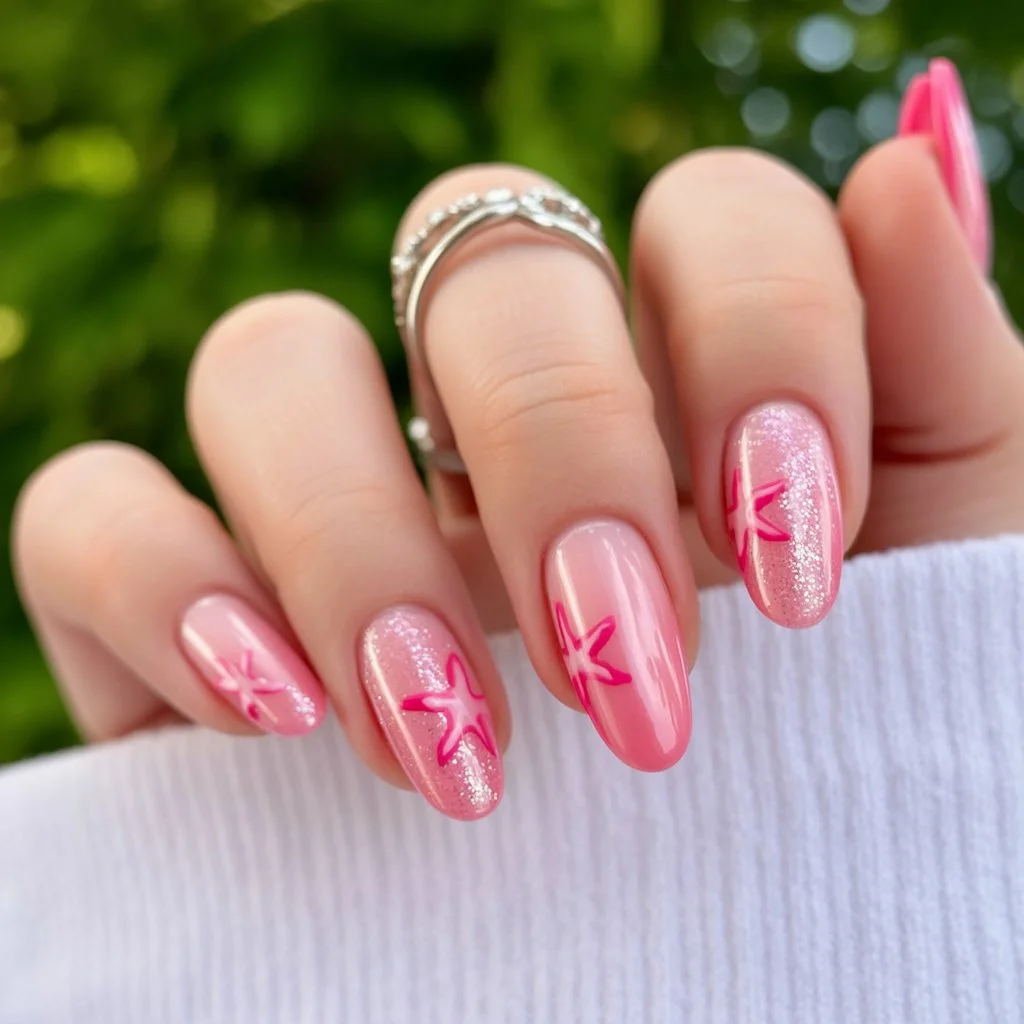
To recreate this design, apply two coats of a warm coral pink across every nail, allowing full drying time before adding any starfish detail. Once ready, use a fine detail brush to paint a small five point starfish shape in white or cream on one or two accent nails, keeping the points slightly uneven for a natural, hand painted appearance rather than anything too rigid. Small texture dots scattered across the starfish body afterward help add a bit more dimension and realism to the shape. Leaving the remaining nails a solid pink keeps the overall design feeling balanced, letting the starfish nails read clearly as an intentional accent rather than getting lost among too much detail. A glossy top coat finishes the look, giving both the pink base and starfish detail a warm, glowing shine.
This design pairs well with bright, cheerful summer outfits and simple gold accessories that complement its warm, sunny color palette. It suits beach vacations, pool parties, or any occasion calling for a manicure that feels playful and lighthearted rather than serious or moody. Many people gravitate toward this look because the warm pink base offers something a bit different from the more commonly seen blue toned starfish designs. On Pinterest, warm colored coastal motifs like this continue to perform well among those wanting their beach nails to feel sunny and upbeat. It stays one of the more cheerful, easy to love choices in this entire collection.
Mermaid Scale Dreams in Soft Coastal Colors
Mermaid scale dreams takes the layered scale technique in a slightly different direction from the earlier pastel version, using softer coastal tones like seafoam, pale blue, and dusty lavender arranged in a more deliberate, gradient like progression up the nail rather than randomly mixed pastels. Each row of scales shifts gradually from one shade to the next, moving from a lighter tone near the cuticle into a slightly deeper one near the tip, giving the whole pattern a sense of graceful movement in addition to its signature scale texture. This more structured color progression sets it apart from other scale designs, offering a slightly calmer, more intentional feeling rather than a scattered mix of unrelated shades. It works best on longer nails, since the gradual color shift needs several rows to develop properly and read clearly.
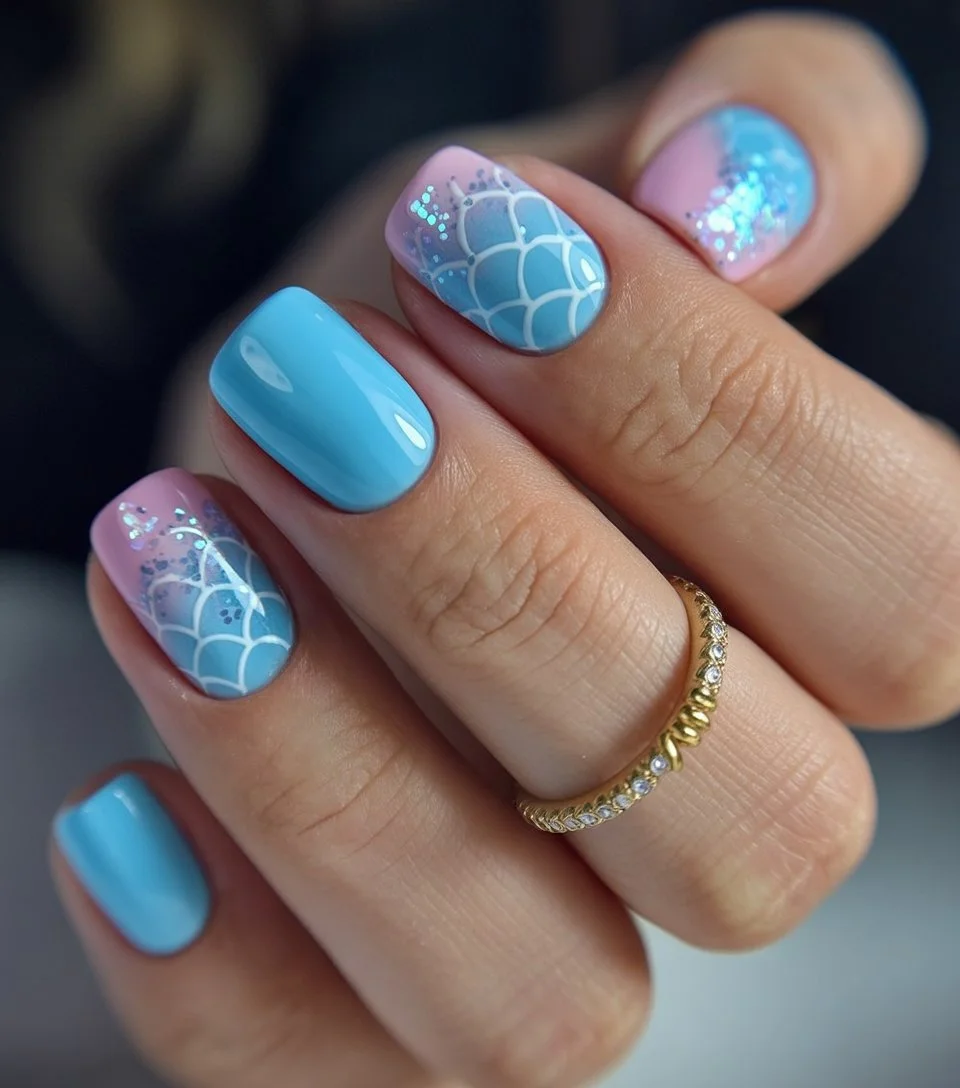
Building this look starts with a white or very pale base coat, offering a clean surface for the scales to stand out against. Using a small round brush or dotting tool, paint the first row of semicircle scales near the base of the nail in your lightest chosen shade, then move upward with each subsequent row, gradually shifting toward your deeper color as you go. Each new row should overlap slightly into the gaps of the row below it, maintaining that classic layered scale look throughout the gradient progression. Letting each row dry before starting the next helps keep the colors distinct rather than blurring together as you work. A glossy top coat at the end gives the finished scales their signature glassy shine, tying the gradual color shift together under one smooth, reflective finish.
This design suits soft, romantic summer outfits, particularly anything already leaning toward pastel or dreamy in its own styling. It’s a strong choice for beach themed events or simply anyone wanting a more elevated, detailed take on the popular mermaid scale trend. People often choose this gradient version over a randomly mixed pastel scale pattern because the more intentional color progression feels a bit more polished and considered. On Pinterest, structured gradient scale patterns like this one continue to attract those willing to invest a bit more time for a more elevated finished result. It remains one of the most detailed, visually rewarding designs in this entire roundup.
Jellyfish Glow Nails with Ocean Fantasy Energy
Jellyfish glow nails bring a soft, luminous creature detail into coastal nail art, painting small translucent jellyfish shapes over a deep blue or purple base to create something dreamier and more fantastical than typical beach motifs. The jellyfish themselves are painted with a rounded, semi transparent bell shape at the top, followed by thin, wavy tentacles trailing down toward the tip of the nail, often finished with a touch of shimmer to suggest that soft, glowing quality real jellyfish have when lit from within. This design leans further into ocean fantasy than most other coastal looks in this collection, feeling closer to an aquarium exhibit than a sunny shoreline. It works particularly well on longer nails, since the trailing tentacles need enough vertical space to look graceful rather than cramped.
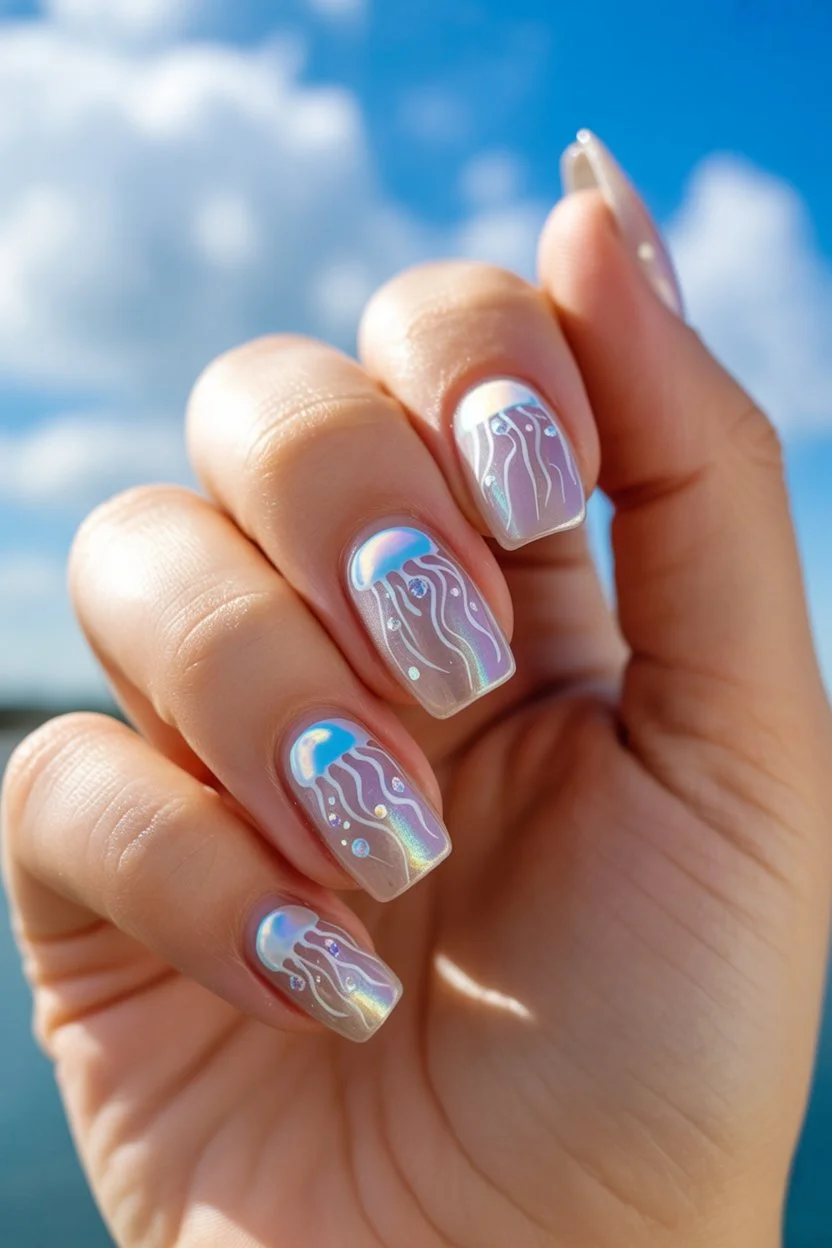
To recreate this design, start with two coats of a deep blue or purple polish, giving the jellyfish plenty of contrast to stand out against once painted. Using a fine detail brush, paint a small rounded bell shape near the top of the nail in a semi sheer white or pale pink, then add several thin, slightly wavy lines trailing downward to represent the tentacles. Keeping the tentacle lines uneven in length and slightly curved helps them look more natural and fluid rather than stiff or mechanical. A touch of fine glitter or shimmer polish dabbed lightly over the jellyfish body afterward adds a soft glow that mimics the way these creatures catch and diffuse light underwater. A glossy top coat finishes the design, sealing in the detail and giving the whole nail a smooth, deep sea shine.
This design pairs well with darker, more dramatic summer outfits, especially anything in deep blue or purple that echoes the nail’s own color palette. It suits aquarium visits, evening beach events, or any occasion calling for a manicure with a bit of fantasy and whimsy built in. Many people are drawn to this look because it offers something genuinely different from typical starfish or shell motifs, exploring a less commonly painted sea creature instead. On Pinterest, unusual ocean creature designs like this one continue to attract those wanting their beach nails to feel imaginative rather than predictable. It remains one of the more inventive, distinctive choices in this entire collection.
Fresh Green Daisy Nails for Slow Summer Mornings
Fresh green daisy nails move away from the ocean theme slightly, pairing a soft sage green base with small white daisy details to capture more of a coastal garden feeling than a strictly underwater one. The daisies themselves follow a classic, simple shape, white oval petals surrounding a small yellow center, painted over the muted green base to create gentle contrast without much visual noise. This combination feels particularly suited to those slow, unhurried mornings often associated with beach vacations, more about the quiet walk to breakfast than the ocean itself. The sage green base offers a nice change of pace from the blues and pinks dominating most of this collection, bringing in an earthier, more grounded tone instead.
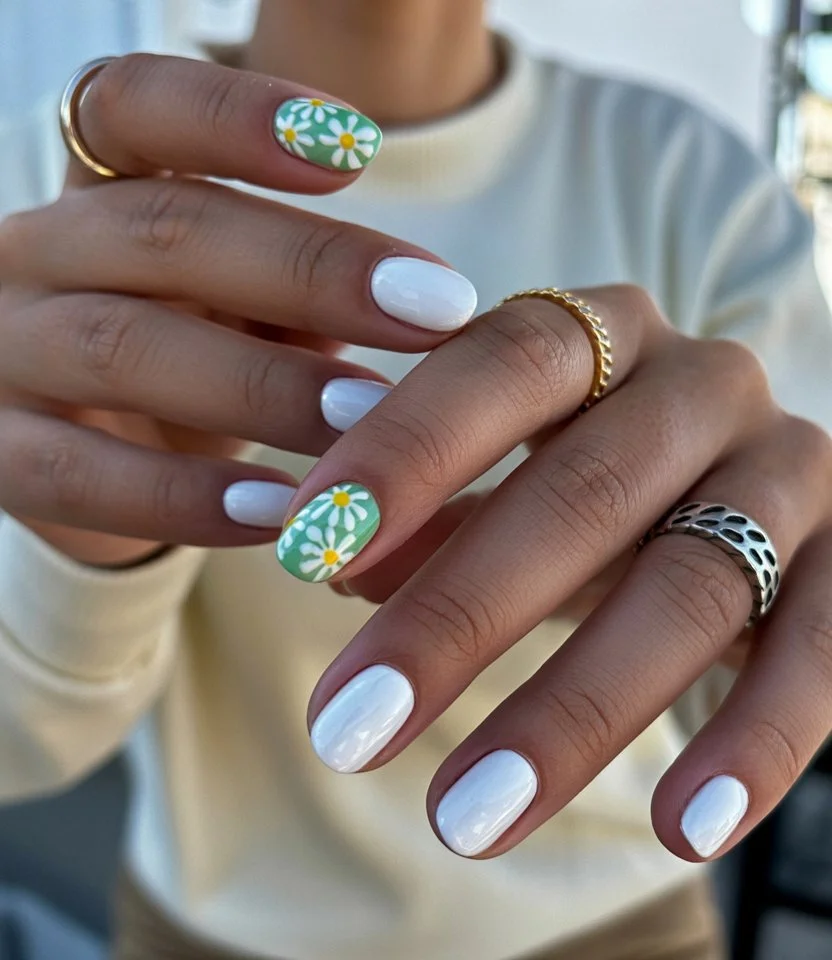
To create this design, apply two coats of a muted sage green polish across every nail, allowing full drying time before beginning the floral detail work. Once ready, use a fine detail brush to paint small oval petals in white, arranging five or six around a central point to form each daisy shape on one or two accent nails. A small yellow dot placed at the center of each flower gives it that classic, easily recognizable daisy appearance. Keeping the daisies small and simply placed, rather than covering the whole nail, maintains the calm, understated quality this design relies on. A glossy top coat finishes the look, giving both the sage base and daisy detail a soft, natural sheen.
This design pairs beautifully with relaxed, natural fabrics like linen and cotton, particularly in earthy or neutral tones that complement the muted green base. It suits slow mornings, beach breakfasts, or any relaxed coastal occasion calling for a gentle, grounded manicure rather than anything bold or beach specific. Many people choose this look because it offers a coastal adjacent feeling without relying on typical ocean colors or motifs. On Pinterest, muted green florals like this continue to be saved by those wanting a softer, more earthy alternative within beach nail inspiration boards. It remains one of the more calming, understated choices in this entire collection.
Turquoise Seashell Nails with Coastal Treasure Details
Turquoise seashell nails pair a vibrant, saturated turquoise base with small hand painted shell details, leaning into a bolder, more energetic color choice than the softer pastel shell designs found elsewhere in this list. The shells themselves are typically painted in white or cream, creating strong contrast against the vivid turquoise background rather than blending softly into a muted palette. This higher contrast approach gives the design a punchier, more vibrant presence, closer to postcard perfect tropical water than a quiet, muted shoreline. The bold turquoise also tends to photograph exceptionally well against tanned skin, which likely contributes to its continued popularity each summer.
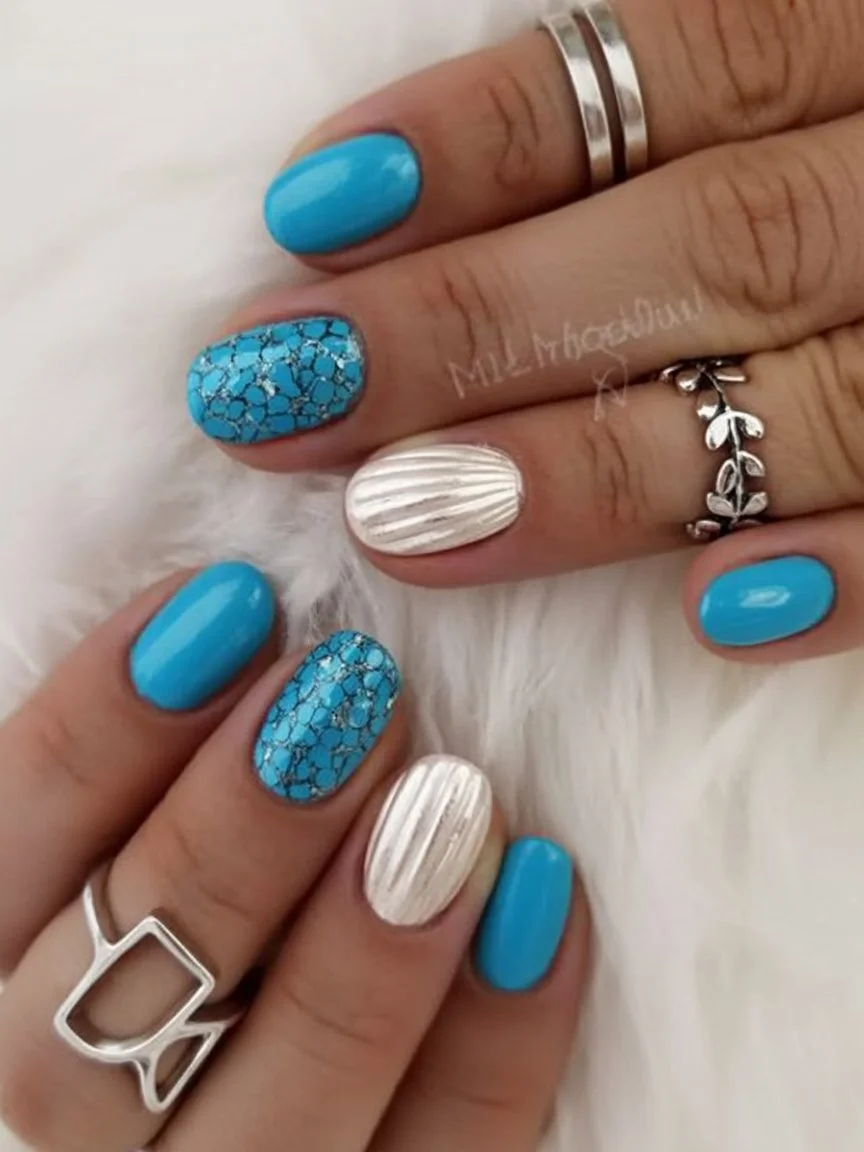
To recreate this design, apply two full coats of a saturated turquoise polish across every nail, allowing plenty of drying time for smooth, vibrant coverage. Once the base has completely set, use a fine detail brush to paint small shell shapes in white or cream, choosing simple spiral or fan forms on one or two accent nails. Adding subtle shading in a light gray or cream tone gives the shells a bit more dimension without disrupting the overall bold, high contrast look. Because the turquoise base is so saturated, keeping the shell detail clean and precise helps it stand out clearly rather than getting visually lost against such a strong background color. A glossy top coat finishes the design, enhancing the vibrancy of the turquoise and giving the shell detail a fresh, glowing shine.
This design pairs beautifully with bright, tropical summer outfits and simple gold jewelry that complements its bold, vivid color palette. It suits beach vacations, pool days, or any occasion calling for a manicure with real color impact and presence. Many people are drawn to this look because it offers a beach theme without shying away from bold, saturated color, standing apart from the more muted designs found throughout this collection. On Pinterest, vibrant turquoise combinations like this one continue to perform well among those wanting maximum color payoff from their coastal nail art. It stays one of the more vivid, eye catching choices in this entire roundup.
Sunset Orange Nails for Endless Golden Hour Moments
Sunset orange nails move away from blended gradients entirely, instead using a single, rich orange shade meant to capture that warm, saturated color the sky takes on right at the peak of golden hour. Rather than fading into pink or purple, this design commits fully to one bold tone, relying on the richness and depth of the orange itself to carry the entire look without any additional blending or detail work. The shade sits somewhere between a true orange and a warm amber, avoiding anything too bright or neon in favor of something that feels more natural and sun warmed. This straightforward, single color approach makes it one of the simpler designs in this collection to execute, though choosing the right depth of orange matters quite a bit for the overall effect.
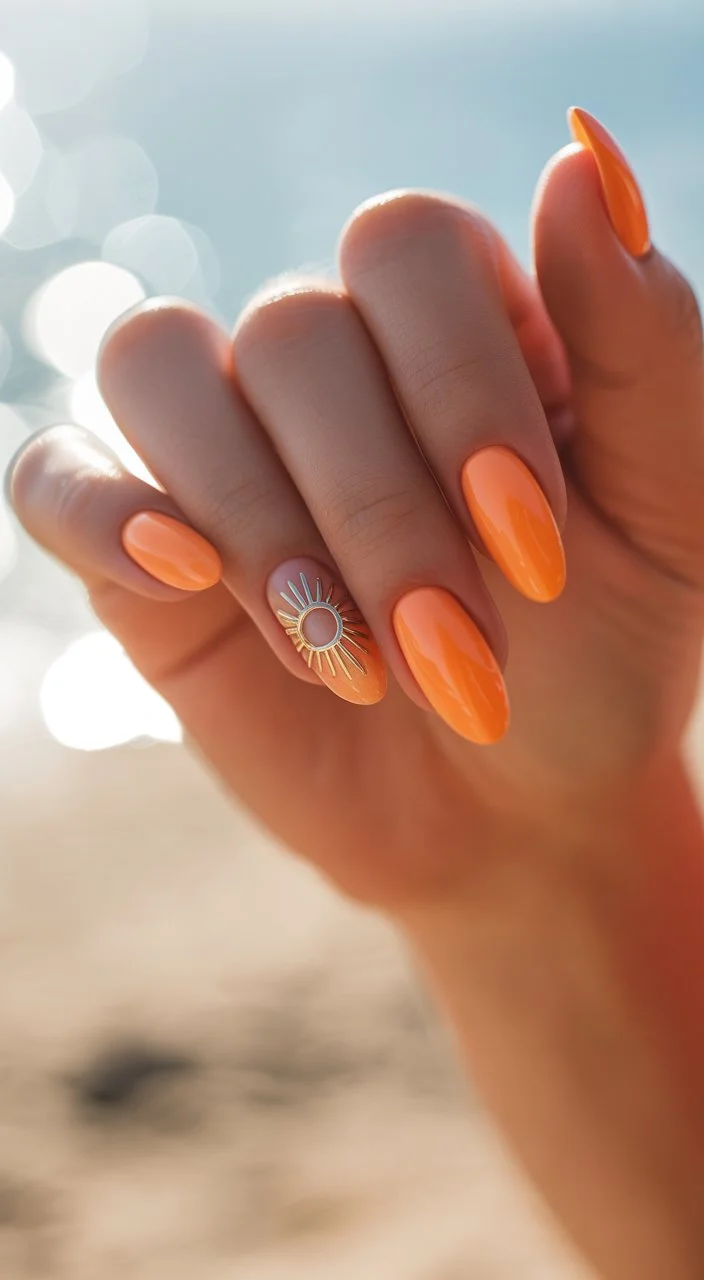
To recreate this look, start by applying a thin base coat to protect the natural nail, then follow with two even layers of your chosen orange polish, letting each coat dry fully before adding the next. Because orange pigments can sometimes apply a bit streaky, especially on the first coat, working in smooth, even strokes and avoiding excess polish on the brush helps keep the color consistent across the whole nail. Some people like adding a very subtle gold shimmer top coat to enhance the sun warmed, golden hour quality even further, though the solid orange alone already reads as warm and inviting on its own. Keeping the application clean along the cuticle line matters here too, since a bold, saturated color like this tends to highlight any unevenness more than a softer shade would. A glossy top coat finishes the design, giving the orange a rich, glowing shine that echoes actual sunset light.
This design pairs beautifully with warm toned summer outfits in cream, rust, or gold, colors that naturally complement the richness of the orange without competing against it. It suits beach bonfires, sunset dinners, or any occasion calling for a bold, warm manicure that captures a specific mood rather than a broad seasonal theme. Many people are drawn to this look because of how directly it connects to a single, recognizable moment, that brief window of golden light right before the sun disappears. On Pinterest, solid warm tones like this continue to be saved by those wanting their nails to evoke a feeling rather than a literal beach scene. It remains one of the more atmospheric, mood driven choices in this entire collection.
Pearl Shine Fantasy with Mermaid Glow Vibes
Pearl shine fantasy nails combine a soft, iridescent pearl finish with subtle mermaid inspired shimmer, creating a design that feels magical and otherworldly without relying on any specific painted detail like scales or sea creatures. The polish itself does most of the work here, using a pearlescent base that shifts gently between white, pink, and pale blue depending on the angle and lighting, giving the nails a soft, glowing quality reminiscent of the inside of a shell. Unlike more literal mermaid designs built around scale texture, this version stays entirely abstract, letting the shifting pearl finish suggest that same fantastical, underwater mood without any figurative painting involved. This style works beautifully on nearly any nail length, since the shimmer effect reads clearly regardless of surface size.
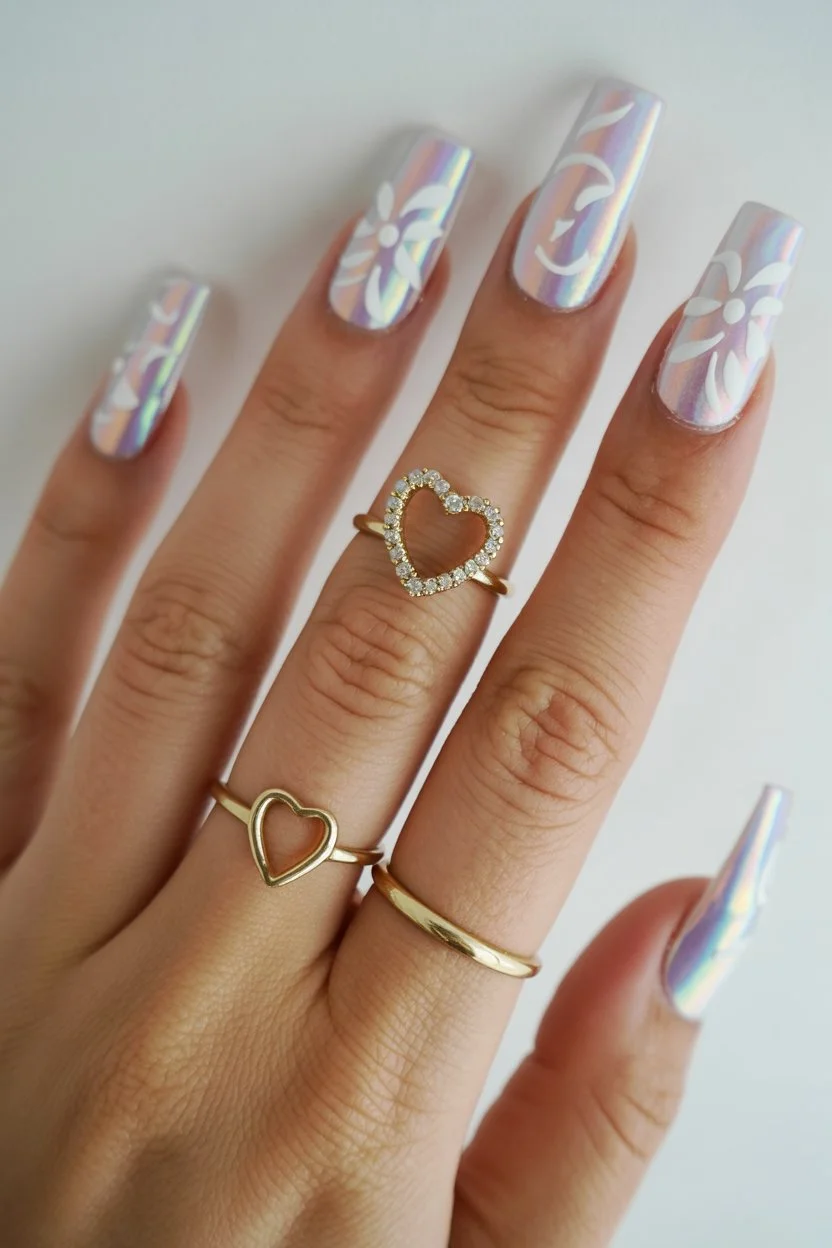
To recreate this look, start with a sheer white or very pale pink base, since pearlescent finishes rely on a light, reflective surface underneath to show their full shimmer effect. Once the base has dried completely, a pearl or iridescent polish gets applied in two thin, even layers, allowing the shimmer to build gradually for smooth, consistent coverage across the nail. Because this finish depends so heavily on how it catches light, working in a well lit area while applying helps you see exactly how the shimmer is building as you go. Some people like adding a touch of extra shimmer near the tip for a slightly more concentrated glow, though the overall pearl finish already looks complete on its own. A glossy top coat can be added for extra shine, though many pearlescent polishes already carry a lovely built in glow that needs very little help.
This design pairs beautifully with soft, flowing summer outfits and simple accessories that let the shimmering nails act as the main visual focus. It suits beach parties, evening events, or any occasion where a bit of soft glamour feels fitting alongside the coastal theme. Many people love this look because it delivers that magical, mermaid adjacent quality without requiring any actual painting or detail work, relying entirely on the polish itself. On Pinterest, abstract shimmer based mermaid looks like this continue to be saved by those wanting an easier alternative to more detailed scale designs. It remains one of the more effortless yet visually striking choices in this entire collection.
Ocean Fade Square Nails with Poolside Energy
Ocean fade square nails combine a classic blue gradient with a clean, structured square shape, giving the design a slightly more polished, modern edge compared to softer, rounder coastal nails elsewhere in this list. The gradient itself moves through several shades of blue, from a pale, almost white blue near the cuticle into a deeper, richer tone near the tip, mimicking the way pool or ocean water often deepens in color as it gets further from the shallow edges. Pairing this fade with a square nail shape, rather than something more rounded like almond or oval, gives the whole look a cleaner, more architectural feel, better suited to those who prefer geometric precision over softer curves. This style works particularly well on medium length nails, where the square shape has enough surface to show off the gradient clearly without looking cramped.
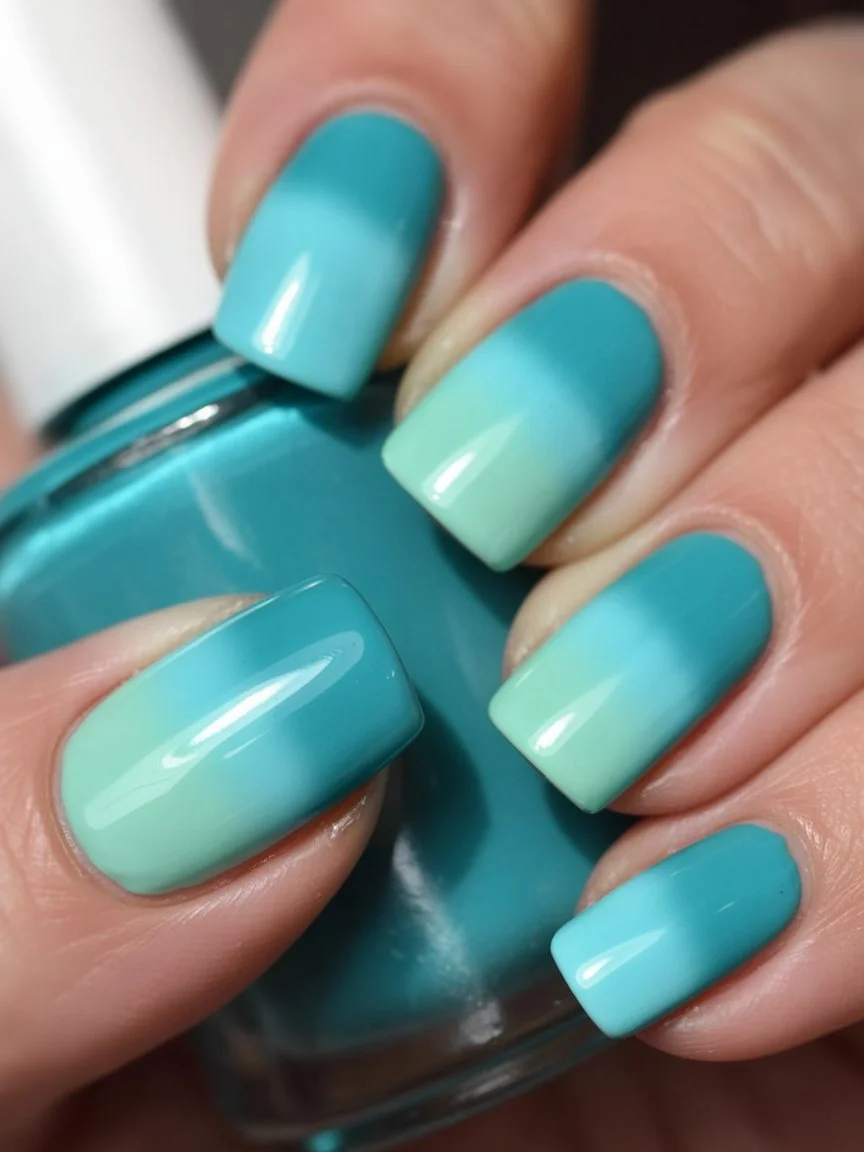
To build this gradient, start by shaping the nails into a clean, even square, filing the edges so the corners stay crisp rather than rounded. Apply a sheer white base coat and let it dry completely before beginning the color work, then apply a pale blue near the cuticle and a deeper, more saturated blue near the tip, blending the two together with a makeup sponge in the middle section of the nail. Because square nails have a flatter surface overall, the gradient tends to blend a bit more evenly here than it might on a curved nail shape, though careful sponge work still matters for a smooth transition. Building each shade gradually in thin layers allows better control over how dramatic the depth shift looks between the lighter and darker blue. A glossy top coat finishes the design, giving the whole gradient a wet, glass like shine that mimics actual pool or ocean water.
This design pairs beautifully with clean, structured summer outfits and simple accessories that complement its more polished, geometric presentation. It suits poolside lounging, resort settings, or any occasion calling for a manicure that feels ocean themed but still fairly refined and modern. Many people are drawn to this look because the square shape offers a nice alternative to the softer, rounder nail shapes more commonly paired with ocean gradients. On Pinterest, structured square nails paired with classic blue fades continue to attract those wanting a slightly cleaner, more architectural take on coastal nail art. It stays one of the more modern, versatile choices in this entire collection.
Final Thoughts On Summer Beach Nails 2026
This collection of coastal nail art proves just how much range the beach theme can offer once you move past the obvious blues and whites, stretching into deep navy starfish designs, warm tropical pinks, muted sea glass tones, and even fantasy inspired jellyfish and mermaid scales. Whether you’re drawn to the quiet elegance of pearl shell nails and silver wave minimalism, the bold energy of turquoise shells and hot pink gradients, or the softer, more whimsical charm of daisy waves and pastel mermaid scales, each design captures a genuinely different piece of what beach season can feel like.
As you decide which of these designs to try first, think less about which one is objectively the most popular and more about which mood actually matches how you want your summer to feel this year. A few ideas here would work beautifully together too, borrowing a wave technique from one design and pairing it with a color palette from another, since nothing on this list is meant to be followed too rigidly. Coastal nail art has room for both the loud, saturated tropical looks and the quiet, muted sea glass tones, and there’s real value in trying more than one across the season rather than picking just a single favorite. Whichever direction you land on, these designs are built to carry that beach feeling with you well past any actual trip to the water, right through the rest of summer.


